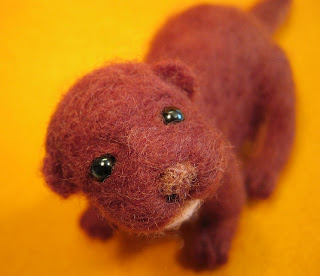
Saturday, February 28, 2009

Needlefelting a Basic Round Shape

It IS winter, isn't it?
These photos were all taken in my backyard this afternoon. It was too nice of a day to stay
inside, though I wasn't really in the mood for the REAL work that needs to be done outside. Weeding, thinning, fertilizing and more weeding. Where did my restorative indoor time go?
Winter is one of my favorite seasons because everything seems to pause and take a long, deep breath. It seems as though my pace is about to pick up, ready or not!


here is a tutorial on how to make the most basic of basic shapes in needlefelting; the sphere. You will use this to make felt beads, doll heads, animal components, and more.


This is a picture of my best felting friend; a foam block. This is my best buddy because a fatty fat foam block does two important things for me; it lets me protect my fingers from the vicious barbed needles and it allows me to work far more quickly than would be possible without one. Some people prefer a smaller, more rectangular foam for portability, by I prefer the 6x6x6 cube. I never stab through it into my jeans, as I used to with my previous flatter mats. Talk about unpleasant! Woof! Messy, too.

You can choose any size of needle that you want. I usually start with a #36 or #38 and then switch to #40 for finish work. You will find the right combination for yourself as you practice.


Here you see the beginning product. This is wool roving. This particular example has been dyed and is ready to use. When you buy roving, it will usually arrive in a small plastic bag. Some producers roll it in a big ball, some fold it, and some just stuff it in the bag and send it to you. As you get to know new sources for wool, you will find the person/establishment that has the product you like best. I have found, however, that it doesn't matter all that much. I DO know that I prefer coarser, carded wool batts for needlefelting. If the item you are thinking about purchasing says Merino tops, don't get it. I LOVE Merino, don't get me wrong, but it is easier to wet felt it than needle felt. It is too fine and soft. I have needled it successfully....it just takes a long time to get a smooth finish.

A little wool goes a long way. It is very easy to add more wool if you misjudged the amount needed for the size of the creation you are making. It is REALLY a pain if you start with too much and have to try and re size it later. Err on the side of conservatism.

Gently pull a strip of wool from your batt. It should pull apart fairly easily. Too add more, just lay the new amount right on top of the old one.

Using both hands, begin at one end of the strip and tightly roll up the wool into a ball shape. You will be tucking the sides in as you go, to keep the shape as ball-like as possible. It reminds me a bit of rolling up a sleeping bag. You want as little air in it as possible. This will make it less time consuming to felt. (Technically, I could take that big glop of roving from the first picture and just keep stabbing and rotating it and eventually it would end up a ball. Seriously, though, who has that much time on their hands and patience in their daily lives?)

This is the time when you should be able to tell whether or not you will need more wool. The size of the ball you have in your happy little fingers at this point is going to get smaller, so if you need a larger size ball, add more wool before you start felting. (It can be added later as well, after you have already felted the ball a bit. Remember, going bigger is pretty easy. Going smaller, once you have already started the felting process, is NOT.)


Keep rolling and keep it tight. Trust me, you'll be glad you did! When doing a ball or cylinder shape, the tighter the roll, the faster the felt.

See? That was quick. Just tuck those last little fibers under and you will be ready to start felting. With a needle. Woo-hoo!
As a side note, I just noticed from the pictures that I am developing a major case of man hands. Too much dish-doing and wet felting, I guess! Let's see...do I have time for a manicure? NOPE!

This picture shows the needle going in fairly deep. I just wanted to illustrate that the wool will do exactly what you tell it to do. If you stab it hard, it will bind down upon itself in the area where you stabbed. If you stab really hard in one spot over and over, you will have a big indentation that will be there pretty much permanently.

This is because the needlefelting needles are causing the microscopic binding of the wool fibers onto themselves. It becomes denser and will follow what you guide it to do using the needles. Push deep and hard, you will get a recessed point. Needle gently, you will get surface binding in the shape that you were needling. (This sounds sort of airy-fairy, but you will TOTALLY understand it when you actually have the materials in hand.)

See? This was the first stab I did. I pushed fairly deep, and there is an indentation. Normally, you wouldn't stab THAT deeply at first. You start by firmly stabbing all around the ball, trying to create and hold that ball shape you are working towards. Begin where the "tail" of the roving is, the last place where you rolled the edge where the fluffy bits are still sticking up a bit. Needle firmly until the basic ball shape holds when you release the wool.

This is what you will have. A fuzzery little wool ball. If I let it go at this point, it will stay a fuzzy ball. In twenty years, it will STILL be a fuzzy ball. As I said, the wool will do what the needle tells it to do.
When doing a ball, it is helpful to stop every so often and roll the wool around in your hand, as you would if you were making a ball out of playdough. That will encourage the ball to take on a perfectly round shape. Additionally, if you roll it between your palms and form an oval, you can then continue to felt it into an oval shape.


Because you went around and around, firmly yet lightly felting the ball across the entire surface, it became a ball. All that is left to do at this point is to more finely felt the external surface of the ball.
This is one happy little fuzzy wool ball bead! Just a bit more refining is needed for my purposes.... It still has too many fibers sticking up.


For finish work, I like to change to a finer needle. This is a #40. I like them for "clean-up" because they bind the wool even a bit more closely. Go around with very shallow stabs to refine the surface area of the shape.


All done! A fairly firm, round ball. I can made a necklace by adding some other wool beads or even by sewing glass beads onto it to create a focal point. I can needle deeper indentations in certain areas and make a face. Whatever you can imagine, you can make. But first, you have to try it.


Warning: It is addictive and, once you master how wool works, very relaxing. The repetitive stab, stab, stab is very therapeutic. Don't say I didn't warn you!


Wednesday, February 25, 2009

Practicing Patience...NOW


OK, have you ever had one of THOSE days? Like, for instance, the kind of day where you wake up, nuke a cup of coffee and then drop the whole thing on your cat, foot and floor. Toasty warm, burnt-foot goodness. NOT! Once you see the cat is OK, you realize that, not only is coffee forming a lovely brown pond on the tile, but it is also dripping from the ceiling! The ceiling! Joy of joys! After much cleaning and maintaining positive thoughts, another cup of coffee is prepared...only to be slopped all over the stove. More patient thoughts ensue and off we go.


THEN, when you are taking the kids to school, a person in a hurry is honking at you to turn right when there is absolutely-not-enough room to execute the maneuver without removing part of the bumper of the car in front of you. So, in the spirit of calm centeredness, you smile sweetly and shrug to the other driver, as if to say "Sorry. As much as I would like to accommodate your wishes, darling, I can't". At which point the lady goes bizerko and attempts to illegally pass you AND the entire row of cars in front of you (which, remember, is impeding YOUR ability to turn) and is honking like a goose on steroids. During mating season. Not only does she almost cause an accident, her teen daughter looks as if she would like to evaporate. Then, to add insult to injury, she ends up having to wait behind you, honking and swearing at everyone, her eyes beginning to look suspiciously like Marty Feldman's. She finally zips around everyone, profanities dancing off her lips like a fairy celebrating Bel thane, and hucks her daughter's banana peel out of the window.

I could feel the love.

My thoughts about this are as follows: The universe is trying to teach me patience and knew, in omniscience, that cleaning up coffee was a good start to practicing for the next step, which was dealing with the extreme peculiarities of others who may or may not be nutso. If I HAD had my standard two cups of joe, I might have had a shaky, caffeine-fueled reaction and could have accidentally hit the gas pedal when the other driver's forehead veins began to move of their own accord. (A true visual distraction if there ever was one.)

At any rate, it was a great opportunity to talk to my children about how to respond to irrational behavior. We also chatted about how our actions can have an impact, either positive or negative, on the world around us. What you give out is what you get back. That sort of thing.

Instead of griping about the lady, the kids ended up feeling sort of sorry for her. After all, it must be very stressful to live like that. And I won't even mention being the daughter of someone who behaves like that. Tiring, to say the least.

That is all I have time to share today. I still have an ill one at home, so my photo tutorial on needlefelting is a bit of a wash for today. Mea culpa. I do have a photo of my most recent piece that will be going up on etsy either tonight or tomorrow, though.


Barring any more illnesses, I will do my best to photograph the stages of needlefelting basic shapes tomorrow.

Until next time, happy crafting! Happy parenting, too!

Tuesday, February 24, 2009

Needlefelting: What materials do I need, what is it, and what can I make?


As promised, this entry will be all about the craft of needlefelting. (Pardon the late posting, but ill children take precidence over computer time. It's a well known fact!)

SUPPLIES
In order to start needlefelting, one only needs three supplies: wool roving, a barbed felting needle, and a foam block.

Where can one get the aforementioned items? Well, Google is always an option, but there are quite a few tried and true people (and companies) with whom I have had great experiences. A super place to start is http://feltingforum.com/. This resource has everything: detailed instructions, technical support, supplies, tutorials, and a network of people willing to help. Kay Petal is just an amazing gal. Check out the Needlefelting thread. You will be amazed at the quality of the work you find there.

A great spot for purchasing felting fiber is Speckled Ram at http://www.speckledram.etsy.com/. I have also purchased wool from A Child's Dream Come True, a store that sells natural toys and supplies at http://www.achildsdream.com/. Just make sure that the wool you order is fairly coarse- it felts much more quickly when using a needle. Many sites will sell Merino top, which is soft and lovely to the touch and nice for wet felting, but it can take a l-o-n-g time to needle felt.

Or you can try a local shop near you. Many yarn or needlework shops have started to carry fiber and felting needles. In Long Beach, CA , there is a tiny gem of a shop called MariPats. She carries all kinds of great fiber-y goodies.


WHAT IS NEEDLEFELTING?

Needlefelting is exactly what it sounds like; making felt while using a pronged needle. This craft has been on the scene for a while, but began gaining in popularity in the late '80's/early 90's. Basically, one takes a fluffy bit of wool roving, which is lofty and airy, and repeatedly stabs at the wool with a special needle. This barbed needle causes micro-knots to tangle the roving which condenses the wool down onto itself. The result is that the wool becomes denser, firmer and more shapely.

On a side note, if one is careless while felting the roving, one can end up with extremely sore fingers and ahem...stained wool. The needles are incredibly sharp and it is easy to get into a rhythm and stop paying attention to the task at hand. Next thing you know, the Frosty the Snowman you were working on looks like a casualty of war.

Because needlefelted items aren't seen everyday, many people think it must be extremely difficult to do. People see the finished products created by felting and say, "I could never do that!"

The response to that is, "Not with THAT attitude, you big quitter." No..wait.. That is the response in my head. The real response is, "Give it a go. It isn't expensive to try and you may find that you love it!"


WHAT CAN I MAKE?

The wool will respond in very predictable ways. If you spread wool out over a foam block and needle in an area very deeply, it will flatten out and firm up quickly, forming a sheet of wool felt. If you form a tight ball using your fingers and gently needle all the way around it over a moderate period of time (again using a foam block as a base to work upon), you can create a variety of different shapes that can be refined to make characters, objects for nature tables, or toys.

There is no end to the kinds of items one can make. Vessels, figures with armatures, and items of clothing are all options. Embellishing different kinds of fabrics can be done as well.

Next time, I will attempt to provide a basic pictoral tutorial to give everyone a better idea of what it looks like when one is felting.

Until next time, happy crafting. And happy parenting, too!

Friday, February 20, 2009

Pediatric Dentists and Needlefelting


Well, my youngest child has my teeth. We had been seeing a general dentist and everything seemed to be fine. Seemed to be. I noticed a few spots that looked a little "off", but when I questioned the dentist, I was told not to worry. Long story short, I DID start to worry and decided to take my boy to a pediatric dentist. I am glad that I did! Those areas that I was not supposed to be concerned about turned out to be cavities. Chunky, substantial ones! Yikes!


A good pediatric dentist is worth his/her weight in gold. Within minutes, my boy was at ease, relaxed, and in very capable hands. The interactions were child-centered, positive, and cheerful. My child held as still as can be and had no pain at all. In fact, I would say that the office visit was a very fun experience for him. He is looking forward to going back again. A far cry from the dental panic I had as a child!


The best part was that I learned something from the experience; if you have any doubts as a parent, double check. Many of us are conditioned to accept the words of health professionals as "law". It is best to remember that everyone is human and there are various opinions out there. Had I not followed my instincts, my youngster could have been sitting there getting worse and worse rather than being all fixed up and ready to go, go, go.


As a side note, I was working on some needlefelting as I waited to see how my son would tolerate the procedure and the experience as a whole. (Normally I would have brought a book, but I am trying really hard to carve out time for my craft.) It turned out to be a great opportunity to share my work with others, as many in the office were really curious about needlefelting and what can be done with it. In fact, no one in the office had ever heard of needlefelting, needlesculpture, or any wool based arts and crafts. They wanted the information for my flickr and etsy sites in order to take a peek!


My next post will be a general description of what needlefelting is, what materials are needed, and applications for needlefelting.


Until next time, happy crafting!

Thursday, February 19, 2009

Here We Go


Word on the street is that blogging is a great way to express oneself and stay connected with other people. Since I already keep a tally of my daily doings, I thought I would give it a go. I mean, it isn't all that different from my daily journal, right? Except for the fact that it will be open to others for viewing. (No pressure...) Will that be a good or bad thing? Only time will tell.


I plan to record my musings as I muddle my way through parenthood, piles of wool, and life in general. I also hope to send out kudos to some of my fellow artists and great people at large that I come across in my meanderings.


Artistically, it has been a bit of a slow day. My jewelry components that I ordered have not yet arrived, so the necklaces I had planned on making are a wash, but I did work a bit more on a tiny needlefelted brownie for a felting challenge entitled, "Red". I'll post a picture tomorrow if I can make a bit more headway tonight after the kids are in bed for the night.


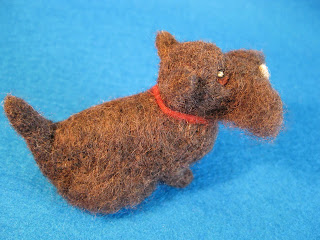
In the meantime, here is a photo of a commissioned piece that I made for a birthday recently.